HAPPY EASTER!
Saturday, March 31, 2018
HAPPY EASTER
Public School kids have a lot of different experiences than homeschool kids. But not too many of them can say that the Easter Bunny comes visit their home!
Monday, March 26, 2018
Farm Cat Life
Right around January just before a big cold front hi that kept us in below freezing temps for 14 days a bob tail cat showed up at our house. It kept hanging out always wanting to be petted. It took to sleeping in a hole under our back deck. The cold front started moving in and it was still around. We accepted that we had been adopted and began feeding her so she could survive the winter. My girls built her a little box out of some expandable foam insulation and boxes. They piled it high with hay and an old towel. They put it near the hole she kept sleeping in and then piled the hole with hay just Incase she wouldn’t go in the box. They built a wind break around it all with some old plywood. I guess she got cold enough and moved into the box. After the cold snap she took to sleeping On top of a box we had tossed out on the back deck. The girls built her a bigger box out of a file box with some hay and a the old towel. She moved right in. She hunts at night and sleeps all day with her head poking out of the box.
# FarmLife is Hard!
Life as a Farm Cat must be hard.
Life as a Farm Cat must be hard.
Tuesday, March 20, 2018
Super Beads by Zirrly Review
The box came in the mail and I really was not sure what to expect. I was trying to figure out how water was going to make these stay together. The girls were excited to try it no matter the outcome. Since our kit came with both a car and a truck I let the girls decide who was going to build which one. We set out all the supplies in the kit. I am going to recommend putting each of the bead colors in to bowls or small containers. We read the directions well there are more pictures than actual reading to be done but that made it simple. Basically you take the plastic peg board and put the pattern under it. Their are tabs to make sure its lined up right. Then you follow the pattern by simply matching up what color bead goes where. They fit very snug on to the peg board. The biggest thing is to make sure you press them all down and they are level and straight. Once you have done this you simply mist it with water. The water activates some sort of amazing glue that sticks the beads together. (The beads become very sticky so you don't want to touch them tell after it dry's. You will also want to make sure your hands are dry before touching any of the beads.) It says to allow it to dry for 30 min before you remove them from the pegs. We had trouble with this. I think it might have been the humidity but ours stayed wet longer than 30 min. We ended up just letting ours dry over night and finished up the project the next morning. After the main pieces are assembled you will use some more beads and some plastic sticks to assemble the main pieces and put the wheels on. A tad more water to stick it all together and you have this super cool truck or car to play with.
The beads stay some what flexible after they are dry and both the car and truck drive quite nicely. I don't know if they meant for them to actually be played with or not. But so far they are holding up very well. My daughter has been driving them around for a weeks now and so far so good. That is some super amazing glue.
Social Media Links:
- Facebook: https://www.facebook.com/Zirrly-1488221441475359/
- Pinterest: https://www.pinterest.com/zirrly/?eq=zirrly&etslf=NaN
- Instagram: https://www.instagram.com/zirrly_/?hl=en Tag: @zirrly_
- YouTube: https://www.youtube.com/channel/UCtsk7AY7EYG91LieNgsFy2A/featured?view_as=subscriber
Thursday, March 8, 2018
Progress
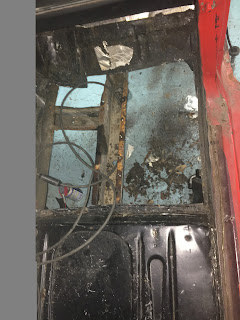
Making some progress on the 65. Resto work is always slow especially when you work 2 jobs and homeschooling. I have been slowly nibbling away at the work on the 65 Mustang. For about 3 months now, I have been chasing rust from one end of the car to the other. I started with the front frame rails which yall have seen pictures of. Then came the floor boards... Once I got the floor boards cut out I found rust out around the torque box on the left hand side. So that lead me to ordering a new torque box and partial frame patch. Since I am waiting on the to come in (it was back ordered) I am currently removing the floor of the trunk so that I can do a rear frame replacement. When I get these last pieces in I will be ready to put the floor board back in. Progress is slow but I will get there.


Thursday, March 1, 2018
Subscribe to:
Comments (Atom)


